The Basics of Car Air Conditioning Maintenance Part2
Car Air Conditioner Performance Test
You can also outsource to an automotive electronics shop. Air conditioner performance test is relatively easy to do, so you should try it.
What to prepare
- Thermometer (either analog or digital)
- humidity meter
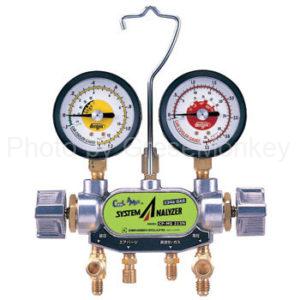
- Manifold gauge (to measure the high and low pressure side of an air conditioner)
The first step in troubleshooting the air conditioner should be to install a manifold gauge on the vehicle that has been shut down overnight or so and check the balance between the low and high pressure gauges.
The dry-moisture gauge should be installed near the air conditioner intake and the thermometer should be installed near the air outlet. Since the temperature and relative temperature at the inlet can be measured by the dry-moisture gauge and the temperature at the air outlet by the thermometer Record the temperature of each one. However, there are prerequisites for this: the car door must be fully open and in the shade, and the engine speed must be Keep it at about 1500~2500rpm, the air flow rate of the blower is maximized and the temperature control is maximized to cool it down, then The measurement should be made under the condition that the outside temperature of

Figure 1: Air Conditioner Performance Test Chart and Air Line Diagram
Figure 1 shows the air conditioner performance test chart (air line diagram). Assuming that the dry bulb temperature at the inlet is 25°C and the wet bulb temperature is 19.5°C in the dry humidity meter, the relative humidity is It can be seen that it is 60%. Based on this, if the temperature at the air outlet is 8°C, the temperature at the inlet (dry-bulb temperature of the dry-moisture meter) and The temperature difference is 17 degrees Celsius in the standard performance table shown in Figure 2 below, and the condition of the air conditioner is good according to the performance test chart. It can be determined that.

Figure 2: Air Conditioner Performance Test Chart and Standard Performance Chart
If the values are out of standard and require inspection, it is convenient to install a manifold gauge so that you can diagnose the condition of the refrigerant charge, etc. at the same time.
As for the air conditioner’s coldness, each person may feel it differently, so put your hand on the air outlet and feel the coldness of the air conditioner. It’s much more convincing than “I think it’s working…”. People who like everything hot (like baths and food…) seem to be more demanding of the air conditioner’s ability to cool down. It seems to me that When I ask users who don’t agree with the results of the air conditioning performance test if they like anything hot. , it’s funny because the answer is usually a “yes”.
Familiar Maintenance of Car Air Conditioners
Expansion valve gas leak
Gas leak detectors (CFC leak testers) according to the type of refrigerant gas, such as R12 or R134a. A leak test is performed around the piping of the air conditioner, such as the inlet of the air conditioner, by using In most cases, the air conditioner’s intake port referred to here is the same as the one in the car when the air conditioner is set to internal air circulation. It is located under the passenger seat, near the case unit that houses the air conditioning filter. (You can find it by following the air conditioner filter. If it’s not there, it’s near the case where the evaporator is located).
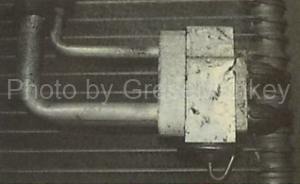
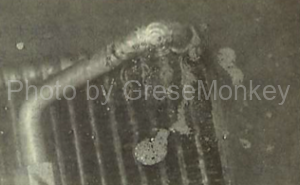
The photo (top) shows the evervolator removed from the cooling unit. The pipes on the high pressure and low pressure sides in the upper left and right photos are blackened and can be identified by visual inspection. It’s leaking gas. If you remove the square unit in this photo, you can see below the photo.
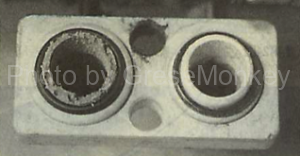
The refrigerant is leaking from the same area, but the refrigerant outlet (low pressure side) of the evaporator is in pieces. You can see that this unit is attached to the expansion valve shown below. Attached to this unit is the expansion valve, shown further below in the photo.
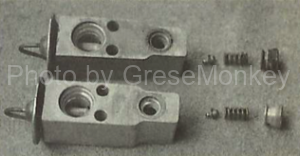
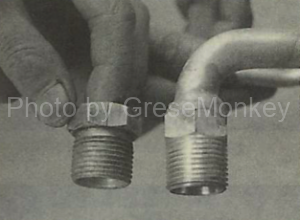
The top photo is the actual one that was installed, but if you look closely, it is still rusty. The same part below is a new one that can be used. It may be hard to tell, but you can see it by observing the plumbing parts.
These parts are made of aluminum, and the air conditioning system usually contains only refrigerant and compressor oil. The reason for this state of affairs even though it is not, is because there may be moisture and debris in the air conditioning pipes. It is. So, when replacing these parts, it is desirable to replace the receiver at the same time.
Gas leak in the main body of the evaporator
If the leak is known from the gas leak detector to be from the vicinity of the evaborator, but it cannot be determined by visual inspection whether the leak is from the body or from the junction with the expansion valve, the leak should be checked by injecting inert gas (nitrogen) into the evaborator at a pressure of 18 kg/cm2.

When I left the epaborator in the water for a while in that condition, it began to bubble (see photo above). Replacing the epaulet is costly, but if the leak is on the surface, it can be repaired. Sometimes. However, it is important to apply pressure after the repair and watch the situation overnight, and it is not possible to get compensation for a long time after the repair. You have to remember to tell the user that “I’m not going to “I’m not going to replace that. But in these times, sometimes it’s unavoidable.

After removing the evaporator or condenser, the piping must be taped. It is necessary to prevent air (moisture) from getting into the material. (Photo above).
It is important to remove the condenser and compressor from the front area of the car in order to prevent the air from getting into the car. I’ve seen some, but that shouldn’t be the case. It’s better to remind the sheet metal shop of this when you outsource, for example.
Also, when disassembling air conditioning pipes, etc., the “O-rings” on the connections should be replaced with new ones.
Gas leak from the connection part of the pipe
It was determined that the gas leak was from the O-ring on the low pressure side pipe of the evaporator. After a while, the air conditioner did not work, so I re-entered the garage. I put refrigerant in and did a leak test, but there was no reaction. I had no choice but to remove the evervolator and inject inert gas to investigate, but there was no leak.
We suspected that the cause was not the O-ring itself, but the connection part of the low pressure side pipe. pipe and dipped it in water under pressure, and still bubbles came out of the connection part of the joint. . Is this caused by vibration during driving, or is it just a matter of compatibility between the connecting screws due to age-related deterioration? problem? Unfortunately, the delivery pipe and the evaborator are one piece. So I modified the joint part of the evaborator (photo below). There doesn’t seem to be any problems. I’ve assembled it in the car and have been following it up since then and the air conditioning seems to be working well.
The joint of the fabricated evaborator
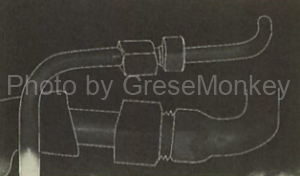
The machined epaulet joint (lower side is the low pressure side) attached to the car.
This may be a case where the evaporator should be replaced, but the parts that can be handled by machining should be done. It would be. Just like wheel alignment, replacing parts alone lacks maintenance dynamics and First of all, it would reduce the burden on the user and increase their confidence in the product. We are not carelessly “cutting, trimming and adding”.
Careful with the vacuum
The primary purpose of vacuuming an air conditioning line is to remove moisture from the line. It has been mentioned again and again that moisture contamination is a cause of trouble. In some cases, moisture contamination causes the expansion valve to rust and The small hole in the expansion valve is frozen (in this case, the manifold gauge is at low pressure side is negative pressure, and the high pressure side often shows 5-6 kg/cm2), which makes the air conditioner work worse. This can cause a variety of problems, such as In order to prevent such problems, it is the last big job before refrigerant loading, so it is necessary to be careful.
The reason why water is removed from a vacuum is because water boils at 100°C and the vacuum is used to remove the water. It turns into a gas. However, at the top of the mountain where the pressure is low, the boiling point is lowered, and it is not possible to cook rice without a pressure cooker. cannot be done. If you reduce the air pressure even further to create a vacuum, the water will boil at room temperature, so you can take the water that has become a gas. The water in the flask can be extracted by the pump along with the air. In chemistry experiments, if you fill a flask with water and close it with a pump to make the inside of the flask a vacuum , the water began to boil, even though the fire was not being lit from below. By these principles, the water in the pipes is completely removed by the vacuum pull.
It goes without saying that most air conditioning problems are due to this “air contamination”.