Order when lowering the cylinder head
I am going to lower the cylinder head to replace the cylinder head gasket, which is the cause of overheating, but the order in my case is as follows.
- Disassembly of exhaust system (exhaust manifold)
- Disassembly of intake system · electrical system (inlet manifold)
- Tappet cover removal
- Disassembly of timing belt and water pump
- Lower the cylinder head
Timing belt / water pump removal
Since we lower the cylinder head, it is not necessary to worry about fit marks etc when removing the timing belt, but since it is luck later that we tailor it properly, it is better to remove it properly after adjusting it properly. Since it is quite troublesome to check the matching mark of the camshaft and sprocket, it is better to have a camera of a mobile phone or a smartphone. Also, since you can not secure a work space unless you remove the engine mount on the left side and the bracket, you need to devise such as to suspend the engine body or to support the engine from the underside with a jack. I forgot to take a picture this time, maybe it may be hard to understand, but this time I have taken measures to support the engine while keeping the paddle up and down on the panta jack mounted on the car.
Remove the fan belt / air conditioner belt
Remove the two covers in front of the picture, you can see the two belts that are hanging on the alternator and the air conditioner · compressor, so let’s remove it quickly. Please note that the engine oil level gauge in front is better because it is easier to do work, but engine oil will leak out.
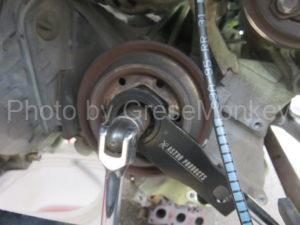
Loosen the crank pulley bolt
Lock the crank pulley bolt with a spinner handle etc., using anti-rotation special tool. By the way, the direction of rotation of this engine is left turn but right screw. Please be careful not to break in any case. It’s hard to say clearly. Impact wrench can be used if it does not loose by all means, but let’s try to relax with hand power as much as possible. (It is basic of engine maintenance)
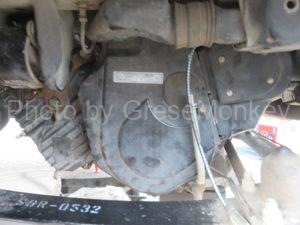
Remove the timing belt cover
Remove the crank pulley and remove the timing belt cover. While detaching the engine mount bracket on the way, please be careful not to remove it as much as possible since the TDC sensor is attached to this bracket. This time we will work the engine carefully while raising and lowering the position of the engine body slightly with the vehicle jack supporting the engine.
The brown part is the engine mount bracket
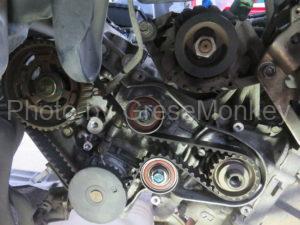
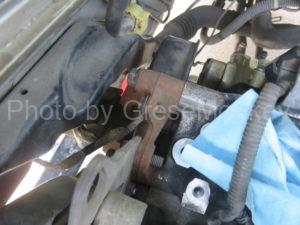
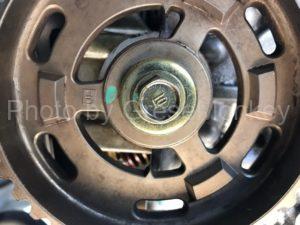
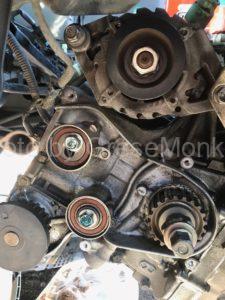
Check the match mark and match
The crankshaft is a triangular mark of the sprocket and an arrow mark of the engine block. When the cam shaft marks the “up” mark engraved on the sprocket at a right angle upper part with respect to the cylinder head, triangle projections staggered inwardly of the inner periphery of the sprocket are formed on the line of the side part of the cylinder head Let’s make sure that it points exactly. This can not be done accurately unless you check the engine from the front. So, if you apply a mirror of an appropriate size, or if you shoot from the front with a cell phone or a smart phone super high performance camera, it will work. If you take dozens of too much images, you will consume memory, so exactly it is a place to check while taking a shooting mode.
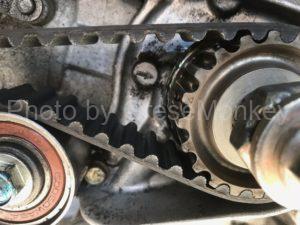
Crankshaft mating mark
Camshaft mate mark
Loosen the bolt of the tensioner, push up the tensioner to the top, let’s remove the timing belt.
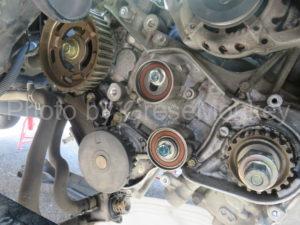
Also, in this state, the water pump is only staying at 4 bolts, so loosen it and remove it. (Lower left in the photo)
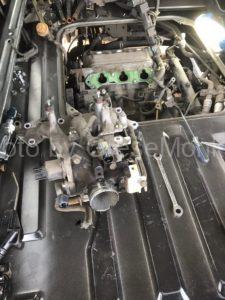
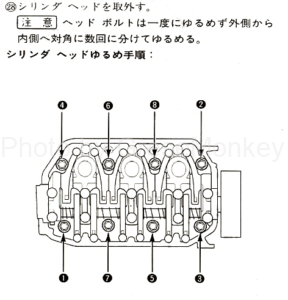
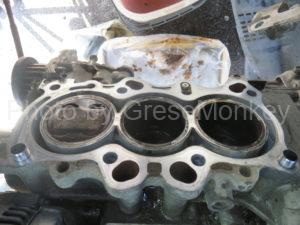
Remove the cylinder head
Loosen the head bolt
Remove the timing belt / water pump and remove the cylinder head as it is. It is not necessary to remove the camshaft, sprocket and rocker shaft. After confirming that there are no forgetting to remove hoses etc around the cylinder head, loosen the head bolt suddenly without hesitation. However, since the head bolt has an order to relax, I think that work will surely go well if it protects it. If it fails I do not care what it is. Loosen the bolts and remove them. It’s just that.
Loosen and lift the cylinder head by raising it to remove it. It is natural, but it is very heavy. However, this car’s engine is a three-cylinder engine, so it’s a light one in the head. Why, I should be able to lift by as much as I can. It will surely go well even if you diving under the car and attack from below. There is nothing like that this time from attacking from the top, but I suddenly lifted it up and removed it. In the unlikely event that you can not withstand the weight, you can drop it, if possible, it may be a single hand to lay down mats and so on. There is also a way to attack from the bottom, but this time it is lifting up with a jack and a rigid rack instead of a lift, so it is more appropriate to think about a strategy to attack from the top, considering the risk of falling into yourself and getting hurt. I decided to do it.
Even though it seems like simple work, in any case, after carefully examining your physical strength and physical strength, the working environment of the car and the equipment that can be used, taking into consideration safety sufficiently and working I think that you should work. If I fail here, I am too sad. So I thought that this work was one of the mountains of this repair worked.
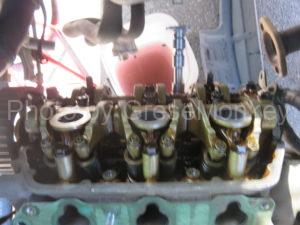
Check the condition of the cylinder head gasket
I dropped the head, so I confirmed the gasket at once. As you can see from the photograph of the contact area of the combustion chamber and the waterline part located around it, there are afterthought. (See photo)
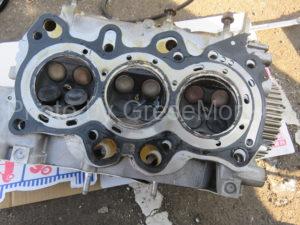
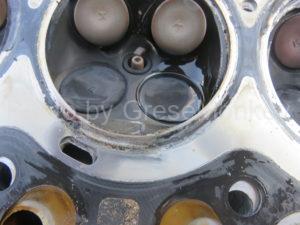
When I looked closely, I was able to check after getting out to parts of various places. However, the state of damage of the engine body and the cylinder head itself seemed not to be too severe in appearance. So it seems just to change head gasket as it is.
to be continued.