Formula 2009 year: Honda fit model: GE6 engine model: L13A mileage: 181, 500 km
Honda Fit’s car inspection and maintenance
It is a car inspection and maintenance of my car. Jacking up and checking in advance, I could hardly see where the mileage was mostly damaged, for a mileage of 180,000 kilos. Since there was no particular problem in the downside and the appearance, I thought whether I should bring in the inspection without carrying anything as it is, but I decided to replace expendable parts considering the number of mileage, and to do a car inspection indefinitely.
The contents of the car inspection service (replacement parts etc.) are as follows.
- Engine oil change 3.5 l (Honda genuine 0 w – 20)
- Exchange of oil element
- Air element exchange
- Wiper rubber exchange
- Front disk pad exchange
- Brake oil exchange 1.0 ℓ
- Brake adjustment
- HMMF (Honda · Multimatic Fluid) exchange
- Replace the plug
Cost of parts will be available if you prepare about 12,000 yen ~ 14,000 yen for the above parts. (Online mail order price)
HMMF (Honda · Multimatic Fluid) exchange
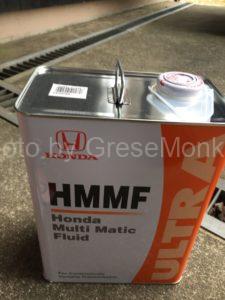
HMMF (Honda · Multimatic Fluid) will be exchanged because the number of mileage exceeds 180,000 km. I am exchanging about a mileage of about 100,000 kilometers roughly as a guide. Unlike other manufacturers, the Honda transmission of this type is a different type of transmission from the ordinary CVT called multimatic, so you must use special oil. Do not accidentally use commercially available CVT oil. Also, although this model is “GE ~”, the model of the model “GD ~” in one year ago is a type of model “GE ~”, but the fitting of the model “GD ~” occurs with the malfunction of the electromagnetic clutch inside the multimatic, There is a case that symptoms such as “judder” frequently occurs and symptoms can be suppressed by exchanging HMMF. As for model “GE ~” and “GD ~” too, the exchange method of HMMF is almost the same, so it will be helpful.
Specified amount of HMMF
Heisei era21 year model: DBA-GE6 engine model: L13A. Fit. HMMF
- Replacement capacity: 3.0 ℓ
- Transmission OH: 6.35 liters
Specified amount with level gauge (All of them are stopped and measured)
- COLD (cold): Level gauge is COLD, it is between upper and lower
- HOT (after warming up – After radiator fan has rotated twice): Level gauge is HOT, it is between upper and lower
In addition, a total of 8.0 liters (2 liter of 4 liters) will be required at the time of replacement.
Extraction and injection of HMMF
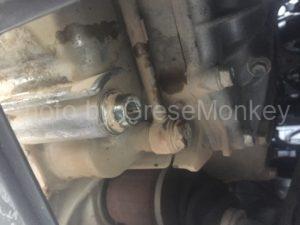
Loosen the drain bolt at the position of the photograph at the bottom of the transmission and pull out the HMMF. At this time, if you remove the level gauge from the upper part of the engine room, it gets out cleanly. Be careful not to let fine dust or the like get inside the transmission at this time. Also, unlike engine oil exchanges, paying attention to this as the oil blows out considerably when pulling out the drain bolt.
If it is possible to extract HMMF by the specified value only if it is possible to measure it, if it is measured exactly by the actual amount that you sampled it becomes one guide at the time of injection. As one method of measuring the amount that has been sampled out, it is recommended to take the extracted waste oil directly into the jug used for oil change and measure it with the memory of the mug. Although there is not much difference that it is extremely different from the actual prescribed value, there is about an error of about 0.5 liter. After replacing the engine, start warming up and the HMMF expands, so the amount of measurement will change again. In the case of a transmission, even if the amount of oil used slightly changes, there is a possibility of causing trouble, so I think that it was better to be careful enough at the time of replacement.

When extracting the HMMF, securely tighten the drain bolt.
- Transmission case · Drain bolt Tightening torque: 4.9 Nm (5.9 kgf)
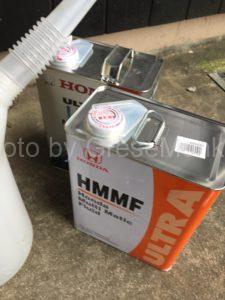
We will inject HMMF from the oil level gauge part of the transmission. At this time it is very convenient to inject and make your own faucet with a tap water hose attached as shown in the picture. The thickness of the hose is the same as that used in ordinary household kitchens, bathrooms, etc. It is all right. Just cut this into an appropriate length and insert it into the funnel is OK. Insert the cut of the hose into the extracted part of the oil level gauge and gradually inject it while confirming that no dust will enter the HMMF.
Transmission hitting work
After injecting the specified amount of HMMF, make sure the oil level at COLD is at the specified value with oil level gauge. Start the engine and do the hitting work of the transmission in the following way.
Transmission attachment work procedure when replacing HMMF
- Stop the car at a level place, stop the wheel and pull the side brake. Since there are times when you let the accelerator fully open, please pay attention to surrounding safety and work.
- Shift lever fully open the accelerator with D range: 3 seconds
- Shift lever N range with 3000 rpm: 20 seconds
- Shift lever fully open the accelerator with D range: 3 seconds
- Shift lever N range with 3000 rpm: 20 seconds
- Shift lever R range to fully open the accelerator: 3 seconds
- Shift lever N range with 3000 rpm: 20 seconds
- Do 1 to 6 above twice as one set. Then warm up the engine until the radiator fan rotates twice and check the HMMF with a level gauge.
- Jack up again and change the HMMF.
- Perform the above 1 to 6 work again, and finally confirm the HMMF amount with the level gauge.
Perform break-in operation
After hitting work, we will do a break-in operation to make HMMF fit to the transmission. At this time, increase the speed up to 60 km / h in a state with no electric load on a flat road, then release the accelerator for 5 seconds. This will initialize (reset) the computer that electronically controls the multimatic · transmission. By further running from this state, the computer will learn the driving condition and will shift to the gear shift timing according to the driver’s usage situation. Immediately after exchanging the HMMF, the driving feeling may change compared to the previous state, so it seems to be necessary for the user to explain. For your own driving you will need to run until the learning situation changes.
When the break-in operation is over, the engine is cooled sufficiently, and finally the level gauge confirms the specified amount of HMMF and it is the end.