Formula 2009 year: Honda fit model: GE6 engine model: L13A mileage: 181, 500 km

Honda Fit’s car inspection and maintenance
It is a car inspection and maintenance of my car. Jacking up and checking in advance, I could hardly see where the mileage was mostly damaged, for a mileage of 180,000 kilos. Since there was no particular problem in the downside and the appearance, I thought whether I should bring in the inspection without carrying anything as it is, but I decided to replace expendable parts considering the number of mileage, and to do a car inspection indefinitely.
The contents of the car inspection service (replacement parts etc.) are as follows.
- Engine oil change 3.5 l (Honda genuine 0 w – 20)
- Exchange of oil element
- Air element exchange
- Wiper rubber exchange
- Front disk pad exchange
- Brake oil exchange 1.0 ℓ
- Brake adjustment
- HMMF (Honda · Multimatic Fluid) exchange
- Replace the plug
Cost of parts will be available if you prepare about 12,000 yen ~ 14,000 yen for the above parts. (Online mail order price)
Rear brake adjustment
For liter class FF cars and mini vehicles like Honda Fit, most of the Japanese cars have rear brakes as drum type, and by adjusting the hit (gap) between the brake drum and the brake shoes, the third brake You can adjust the pull of the pedal and the effectiveness of the rear brake to some extent.
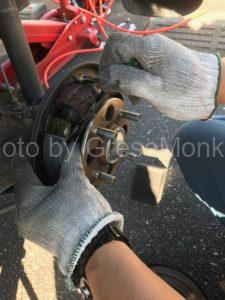
Remove the drum
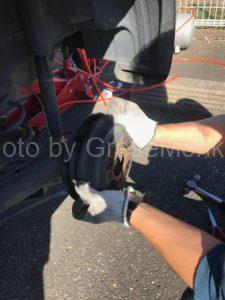
First remove the drum. Make sure that the side brake lever is fully in place and that the drum rotates smoothly, then remove the drum by hand. If it does not come off and stick, you can easily remove it by tapping with a hammer or the like.
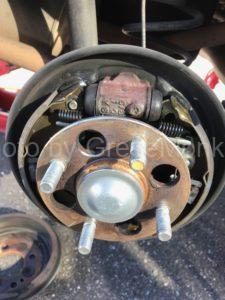
Clean up and grease up
Use air duster, brake cleaner, etc. to completely remove the dirt attached to the brake body. As for the identity of the dirty item, be careful not to breathe in as it is the soot or brake shoe powder remaining after the brake is burned. After removing the dirt, check if the brake fluid leaks from the cup kit of the wheel cylinder. Screw the wheel cylinder with a small flathead screwdriver to check. Also, whether the wheel brake cylinders move the two brake shoes on both sides by hands to the left or right to move smoothly, whether the installed springs are working properly, or the wires connected to the side brakes are not sticking Make sure.
The easiest thing to understand is to sit alone in the driver’s seat, visually check the movement of the brake shoes by stepping on the brake pedal slowly just a little (really just a little) with the drum removed, but this is too trampled And the piston of the wheel cylinder will pop out so please work carefully. Then, you should never pull the side brake lever at this time. If you pull or pedal too much, you have to return the drum brake OH and the third brake wire to the original carefully.
If there is no abnormality in the above inspection, the contact surface of the brake shoe and brake drum is numbered by No. 60 sandpaper paper so that the burn mark disappears, the drum is polished to the extent that the polished mark reaches to a certain extent, the brake shoe and the drum brake Since there is a mark of grease on the contact surface of the back plate of the back plate, I will pour the new grease there. Since there is no gap, I think that it is easy to use spray type dedicated grease by twisting with a flat-blade screwdriver etc. By the way, I think that Molybdenum Grease is appropriate for the type of grease. (Heat resistant for use for sliding metal)
Brake adjustment procedure
Rotate adjustment adjuster

Using a small flathead screwdriver or a lever dedicated to brake adjustment, rotate the adjustment adjuster and increase the distance between the left and right brake shoes. The position of the adjustment adjuster is located just under the wheel cylinder in the case of this car. With a ratchet mechanism attached to it, the length of the adjustment adjuster itself is expanded by turning it, so that the distance between the brake shoes is gradually widened and the mechanism is set. Since it is a ratchet mechanism, the adjuster rotates only in one direction, so the lock plate is attached to the other side, so please rotate it in the reverse direction with this plate released to restore it. Then, the distance between the left and right brake shoes shrinks.
Cover with drum brake and hit with a hammer
Basically, if the draw of the side brake is large, adjust the adjuster adjuster in the direction to spread the brake shoe. After spreading it to some extent, try setting a drum. If the drum does not enter, it is evidence that the adjuster is spreading too much, shorten it gradually from that state and repeat the setting and let’s shorten the adjustment adjuster until the drum enters smoothly to a certain extent.

In the other case, I think whether there is a little resistance as “Susuku” in the case of rotating the drum with the drum set cleanly. At this time, when you hit the drum body from above with a hammer, if you hear a slightly clogged sound like “Cut” or “Cotton”, it can be judged that the clearance between the drum and the brake shoe is at an appropriate interval Let’s see. Since sounds such as “Kahn” or “Corn” can be judged as having a wide gap, please try spreading the adjuster again 3 to 4 frames at a time. It is easier to adjust if you can remember how many frames have been unfolded and how many frames have been returned from the very first state (the state where the drum was removed). I may not be familiar with the inside so I may write down it.
Proper adjustment point

Basically, the point of appropriate brake adjustment is to spread the adjuster until the drum does not enter, then adjust it to the limit as to whether the drum enters or does not enter, then shrink the adjuster several frames and set the drum a little In the condition of resistance to rotation, the hammer’s hammering sound is somewhat clogged and the condition is the same in both the left and right drums, and the side brake pulling margin at that time is 4 to 5 notches ( Ticking sound) position. At this time please make sure the drum brake turns smoothly by hand. If it is not extreme force and it does not turn and the side brake lever is too hard it will cause dragging. Also, if the notch of the side brake is not an extreme force, it will be hard to use for people without the power of the left arm if notching is not applied, so loosen the adjustment adjuster according to the customer’s request, etc., Please remember the point where the side brake is applied.
Mechanism and importance of drum brake automatic adjustment
Adjustment of drum brake The reason why the adjuster only turns in one direction is that the spring that stops the plate that locks the adjuster becomes thinner due to the wear of the brake shoe and the clearance between the drum and the drum Automatically moves the plate, moves the adjuster in the direction of rotation, moves the brake shoe in the direction to open it, normally locks so as not to rotate in the reverse direction and keeps the clearance between the brake shoe and the drum constant It is because it plays a role to keep.
For example, this automatic adjustment function works properly that the side brake is working properly even if the side brake pulls widely change in two years between the time of vehicle inspection and the next vehicle inspection That is why. The drawer becomes wider because the side brake wire slightly expands and this automatic adjustment function is also fully functioning as the degree of wear of the brake shoe and the state of the drum and the wheel cylinder constantly change It is because it can not say. So much more regular brake adjustment is required.
Brake adjustment originally set the drum after setting the drum brake normally, it is described in the manual to do with adjustment tool etc. from the service hole on the back side. However, this time, I explained in a way to do it while detaching the drum many times in order to get to know the mechanism. Brakes such as trucks can not be adjusted unless it is in a way that covers drums. However, basically the same as this commentary, grasp the condition that the adjuster was up to the limit, and return it slightly. In terms of that it is almost the same as ordinary cars and light cars. Adjusting the braking effectiveness This brake adjustment is an essential element that must be mastered without fail in car maintenance, so I hope you find this article useful as a reference.